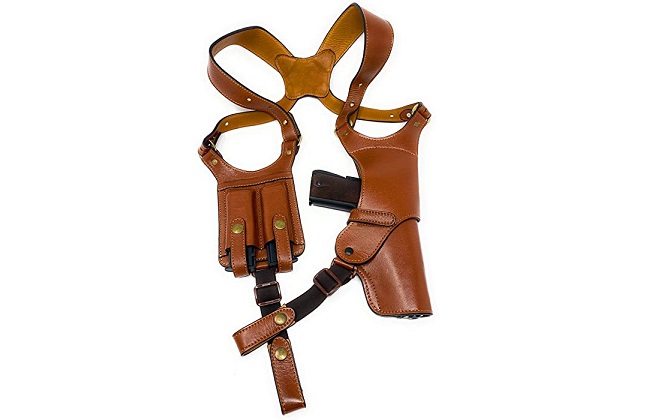
A shoulder holster gives you instant access to your handgun when you are strapped to your car seat. It can also be an excellent choice for concealment while improving overall comfort. While you can buy a shoulder holster for about $50 to $150, you can make your own. All you need are several materials, a few days, and this guide on how to make a shoulder holster.
How to Make a Shoulder Holster
Step 1. Gather Your Tools and Materials
Check your house if you already have any of the following materials. Buy only those that you do not have.
- Leather
- An empty handgun serving as a mold and a guide for making the inserts
- A spool of heavy stitching string
- Leather-stretching clamps
- Leather-stretching blocks
- Needle for stitching
- Hammer
- Razor knife
- Leather cement
- Pronged punches
Step 2. Prepare Your Leather
Start by preparing the large 12×12-inch leather square that will serve as a pocket for your handgun. Fold the leather square in half, ensuring the firearm’s handle sticks out. Cut the leather square to match the gun’s barrel with about an inch of allowance.
Unfold the leather and cut 1-inch tall triangles from the four corners. If you have a large gun, you can cut up to 3 inches.
Soak the leather square in water for about ten minutes or until it is pliable. Squeeze the leather to remove excess water.
Step 3. Create the Holster
Place the leather on a flat surface with the rough side facing down. The less tough leather side will form the holster’s interior.
Position your gun on the leather and wrap the leather over your handgun under the trigger. Create the holster by applying pressure on the leather material and following the gun’s contour. Use the stretching blocks for this step. Secure the stretching blocks using clamps.
Place the holster under the sun to dry for a few hours.
Step 4. Make Holster Inserts
The inserts will stiffen the holster and improve weapon security and safety. Place the top of your handgun over the leather and outline. Do the same for the left and right sides of your pistol. Cut the inserts. It would be best to cut outside the trace, ensuring better adjustments.
Step 5. Place the Inserts into the Holster
Bring the holster inside and remove the clamps. You should see the holster beginning to take shape. Dampen the holster’s outer side. You should feel it wet without leaving water on your fingers.
Insert your empty firearm into the holster. Place the inserts around your weapon inside the holster. Reapply the stretching blocks to ensure a perfect fit and secure with clamps.
Dry the holster with the inserts under the sun for the next 24 to 48 hours.
Step 6. Secure the Inserts
Once the holster is completely dry, it should hold its shape when you remove the clamps and blocks. Apply glue on the holster’s top and place the top insert. Place and clamp blocks over the insert for five to ten minutes. Remove the clamps and blocks and check the holster for the proper fit.
Use a pronged punch to create holes for your stitching needle to go through. A hammer will help you drive the punch through the leather. Stitch and secure the top insert on the leather holster. It would be best to perform a double stitch to secure the insert.
Perform the same process on the side inserts. Observe five to ten-minute glue drying time and ensure a perfect fit before stitching the inserts.
Step 7. Finish Your Holster
Glue the extra leather and secure it with clamps. Allow at least ten minutes to dry. Check for fit. Once satisfied, you can stitch the leather.
Step 8. Make and Add a Shoulder Strap
Cut the small leather rectangle (2×4 inches) to serve as a bridge for the arm loop. Place the middle of the 48-inch long leather strap at the bottom of the leather rectangle and secure it with stitches.
Loop the leather strap’s right side towards the rectangle’s top section. Stitch it to secure. Do the same process with the strap’s left side.
Wear the shoulder straps and position the holster where you want it secured and concealed. Mark the holster’s placement and remove the shoulder straps. Secure the holster to the strap using leather cement and leave it to dry for about 10 to 15 minutes.
Conclusion
The steps on how to make a shoulder holster are straightforward. What is essential is to ensure the correct fit of your handgun in each step before securing the holster. Keep in mind to schedule no more than a week to work on your shoulder holster to guarantee optimum leather workability.